Orange flavoured Rice Pudding

OrangeRicePudding-3

I have been away on a three week long shoot in NY and then snowed under with the post production for it…so I have been too busy to post anything for a while, as you may have noticed. But I’m going to make up for it by making some new treats of new receipes I have found and sharing those receipes if the results come out well.

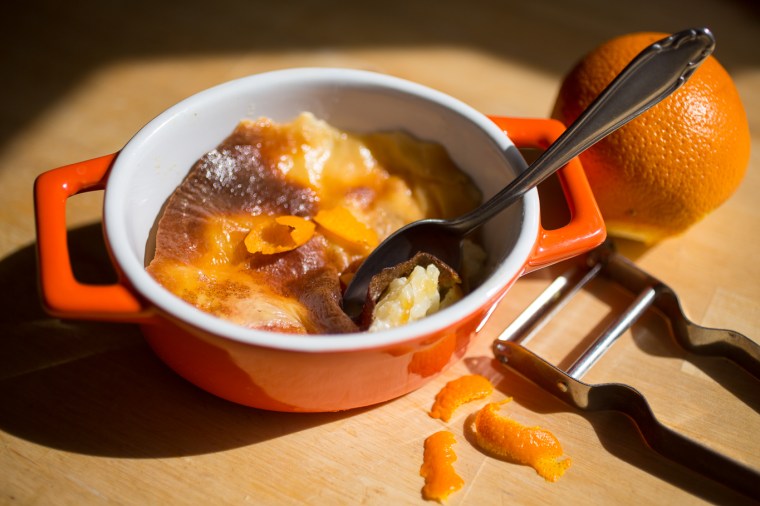
One of the new receipes is the below orange rice pudding I found in the Fernandez and Wells ‘Rustic’ cookbook which caught my eye because of the very beautiful photography by Helen Cathcart.

An easy to make rice pudding sounded like a good way to get a treat that can be eaten when it’s hot out of the oven but also results in leftovers that can be just as tasty, when eaten cold (or re-heated, of course). It’s an easy way to have a breakfast or brunch treat waiting in the fridge – to be topped with some summer fruit compote for example.

The receipe is for a 15 x 25 x 8 cms ovenproof dish but I don’t think it needs to be that high a dish and I made it some little individual dishes instead, for which the baking time can be reduced by about 20 minutes.

For 4 portions you will need

  • butter, for greasing
  • 75g pudding rice
  • 3 strips of orange peel, freshly peeled off an orange with a potato peeler
  • 50g caster sugar
  • 650ml whole milk
  • 1/2 tsp cinnamon

Preheat the oven to 160 degrees Celsius and grease your ovenproof dish.

Combine the rice, orange peel, sugar and milk together in a bowl, then pour the mixture into the prepared dish. Sprinkle the cinnamon over the top and bake for 2 1/2 hours or less if using individual dishes.

Serve with some more orange peel or with a serving of a summery berry fruit compote.

Chocolate Tiramisu

Tiramisu-1

Tiramisu for in the morning – yes, please!

I know it’s rich and rather fancy to have tiramisu in the morning but sometimes you need an extra ‘pick-up’ and that’s what tiramisu is all about. 

A translation of tiramisu would be along the lines of ‘ pick me up’ or even ‘wake me up’ and the name must have been given due to the hit of espresso you get from the espresso soaked sponge fingers.

I can not face alcohol that early in the day though, so I have made this tiramisu without any alcohol and instead have added a layer of chocolate chunks for a little extra sweetness…

For 8 portions you’ll need

  • 500g mascarpone
  • 3 eggs
  • 1 egg yolk
  • 4 tbsp sugar
  • 1 tsp almond essence
  • 50g chocolate
  • ca 260g sponge lady fingers
  • ca 500ml strong espresso
  • cocoa powder to dust
  • a square tin of around 22cm

Start by separating the egg whites from the egg yolks.
Whisk up the egg whites with an electric whisk until stiff.

In another bowl whisk the egg yolks with the sugar, again using your electric whisk, until the mixture becomes a paler colour and fluffy. Add the mascarpone and almond essence and briefly whisk the mixture to create a smooth cream.

Add the whipped egg whites and, using a balloon whisk gently fold them under – at the end you may want to swap the balloon whisk for a spatula. Using both utensils makes it easier to ensure that the egg whites combine with the cream yet don’t break up too much.

Using a big knife chop up the chocolate into small chunks.

Pour the espresso into a shallow dish, such as a soup plate, and soak the sponge fingers in the espresso by laying one side of the biscuit in the espresso for a few seconds then turning it over to let dip the other side in. Work quite quickly here as though you want the sponge fingers to get moist you do not want them soggy to the point where they fall apart!

Lay the soaked sponge fingers next to each other to line the bottom of the tin and once you have create the complete layer sprinkle it with 3/4 of the chocolate chunks (leaving the last 1/4 of the chocolate chunks aside to decorate the finished tiramisu). Top the chocolate covered sponge fingers with half of the mascarpone cream.

Then soak the rest of the sponge fingers in the rest of the espresso and create another layer of sponge fingers on top. Top this second layer of sponge fingers with the rest of the cream.

Dust with cocoa powder and the sprinkle with the chocolate chunks you left aside earlier.

Cover the dish with cling film and leave to set in the fridge for at least 5 hours.

Chocolate Hazelnut Scones

ChocHazelnutScones-1

The other weekend one of my sisters came over to visit me in London (that’s her in the photo holding the tray of scones).

A visitor is always a good reason to get baking, especially if they stay over night and you are going to have a leisurely brunch with them. A batch of home baked treats are a great way to make visitors feel welcome and scones are a quick and easy bake that you can’t do much wrong with, so give it a go.

The hazelnut-chocolate scones here are American scones and I therefore like to cut them in to triangles like they do over there, as opposed to British scones which are usually cut into circles. Of course you can cut them into whatever shape you fancy – squares maybe!?

For 8 scones you’ll need:

  • 280g plain flour, plus a little extra
  • 60g sugar
  • 1 1/2 tsp baking powder
  • 1/2 tsp bicarbonate of soda
  • a good pinch of salt
  • 90g cold butter
  • 120ml buttermilk
  • 1 egg
  • 1/2 tsp of molasses syrup (maple and treacle also work)
  • 100g chocolate (I used 70% dark chocolate but if you want it sweeter go for 50 – 65% milk chocolate)
  • 55g whole, skinned hazelnuts

Roast the hazelnuts in a pan and ensure you keep moving the hazelnuts around as they otherwise easily burn. Once they have taken on a little colour take them out of the pan onto a chopping board and roughly chop them.

Chop up the chocolate into chunks of roughly the same size or a little bigger.

Preheat the oven to gas mark 5 and line a baking tray with baking paper.

In a big bowl combine the flour, sugar, baking powder, bicarb of soda and salt with a spoon. Add the butter, in little pieces and then get your hands inside to rub the butter into the flour mix until you have a crumbly mixture.

In a jug whisk the buttermilk, egg and syrup together, using a balloon whisk. Pour this liquid into the bowl with the dry flour crumbs, add the chopped chocolate and hazelnuts and quickly combine everything with a fork or spoon – only until just combined. You want a lumpy dough!

Tip the dough onto a floured surface and form a big circle with a thickness of around 2cm.

Cut this circle into eight triangles like you would cut a cake into eight pieces and line those on your prepared baking tray.

Bake for 20minutes until the have got a nice golden colour and the chocolate has started to ooze out of them.

Leave to cool for at least 10 minutes on a wire rack before tucking in!

Easter Hot Cross Buns


HotCrossBuns_JaelMarschner-1Happy Easter

They came out a treat!
As per my previous post I know I am late with my Hot Cross Buns, which are usually eaten on Good Friday. But, at least, it’s still Easter and, in a way, they are just a spiced raisin buns you could eat any day, if you leave the crosses off.

I’m always a bit nervous when it comes to yeast based bakes but the receipe here requires the fast acting dried yeast sachets, which I seem to have more success with than fresh yeast. So if like me you are a little shy of baking with yeast, don’t be and try making these.

They are best eaten the day they are made. If you have some left the next day I find 20 seconds in the microwave warm and freshen them up enough for a second Easter breakfast.

For 12 buns you’ll need:

  • 450g strong white/bread flour (plus a little extra for dusting)
  • 2 x 7g sachets easy-blend/fast acting yeast
  • 50g caster sugar
  • 1 tsp salt
  • 150ml warm milk
  • 1 egg, beaten
  • 50g unsalted butter, melted (plus a little extra for greasing)
  • 1 tsp cinnamon
  • 1/2 tsp mixed spice
  • 1/4 nutmeg
  • 100g raisins or currants

And to decorate them:

  • 4 tbsp strong white/bread flour
  • 2 tbsp sugar

Lightly grease a large bowl.

In another large mixing bowl combine the flour, yeast, caster sugar, raisins/currants, salt and spices. Make a well in the middle and pour in the warm milk, 50ml warm water, egg and melted butter. Mix everything to form a dough – the best way to do this is with a wooden spoon until all is mixed well at which point you need to get your hand in. If the dough is too wet add a little more flour, if it is too dry a little more water.

Knead the dough in the bowl until it becomes smooth, then transfer it to the greased bowl and cover it with a damp tea towel. Leave to rise in a warm place (I used a sunny windowsill and wrapped a wooly blanket around the bowl) for about an hour, until doubled in size.

Turn the risen dough onto a floured surface and knead for a few seconds, then divide into 12 even portions. Lightly grease a baking sheet and roll each dough portion into a smooth bun and place them on the baking sheet. With a shape knife cut a cross onto each bun. Cover the buns with a damp tea towel again and leave to rise for 20 minutes, which should again double the size.

Preheat the oven to gas mark 6 while they are rising.

Mix the four tablespoons of water with just enough water to make a runny but thick paste and spoon this paste into a piping bag to pipe crosses onto the buns.

Bake for 12 – 14 minutes until the buns are golden brown. As soon as they are out of the oven, dissolve the four tablespoons of sugar in water and brush the buns with this glaze. Enjoy them warm and have a happy Easter!

Orange and Almond Cake

OrangeAlmondCake_ JaelMarschner-3

Sorry, I am not quite ready to wish you a Happy Easter yet!

It’s Good Friday today and I’m in London. Therefore this post was meant to be about Hot Cross Buns, spiced sweet buns that the English eat on Good Friday.

As I type the yeasty dough for them is – hopefully – rising next to me in the sun and the buns – assuming they turn out well – will still be eaten today. But I have not had a chance to do a trial bake and so can’t post a receipe or photo just yet.  However, if it works out well, you will hear from me again tomorrow and then you can also still make them for Easter; Easter Sunday. Not the right Easter day correct but, hey, we can just call them ‘Hot Easter Buns’ if need be 🙂

For now, I am presenting you an easy receipe for a cake that would be a great addition to any Easter Brunch table (a more German tradition) on any day over this Easter weekend. It’s a great little orange and almond cake, that’s not too sweet or heavy but moist and juicy!

Just note, that you may want to use organic or unsprayed/unwaxed oranges for this cake, as you need to use the whole orange, peel and all.

For a 18cm round cake you’ll need:

  • 1 – 2 small sweet oranges (one for the cake but if you want to decorate the cake with orange peel, like I did,  you will need one more)
  • 50 g butter, plus extra for the cake tin
  • 140g sugar
  • 3 eggs
  • 85g self-raising flour
  • 100g ground almonds
  • icing sugar, to dust the cake

Put one orange in a small pot and cover with cold water. Bring to the boil, then cover with a lid and simmer for an hour. A lovely smell of orange may spread through your flat…

Remove the now squidgy orange with a slotted spoon and leave it to cool on a chopping board. Once it is cold enough to handle, chop it in to pieces and discard the pips.

Preheat the oven to 180 degrees celsius and butter and line the base of a round cake tin.
Tip the chopped up orange, in a food processor or blender and whizz until smooth.
Melt the 50g of butter and set aside.

In a bowl whisk together the eggs and sugar with an electric whisk until light and fluffy, for at least 3 minutes. Gently fold in the flour and ground almonds – I like to use a big spoon for this, gently going through the mixture and turning it over and over until the flour starts to become mixed in.

Add the orange puree and melted butter and fold them under, just as gently. Pour the mixture into your cake tin and bake for about 40 minutes until the cake is brown, springy and a toothpick inserted in the middle comes out clean.

Cool on a wire rack and just before serving, dust with a generous amount of icing sugar and fresh orange peel (using a cocktail maker tool to get thin strips if this is the look you are after).