Nectarine and Blueberry Muffins

NectBlueberryMuffins-4smallThere’s not many tastier fruits than ripe and juicy nectarines. The ones you can only get in the height of summer.

The other day I thought I had gotten my hands of some of them but unfortunately, they were not the ripe and juicy nectarines I was expecting. And there is not much worse than those unripe and hard nectarines you usually get, when it’s not the height of summer…

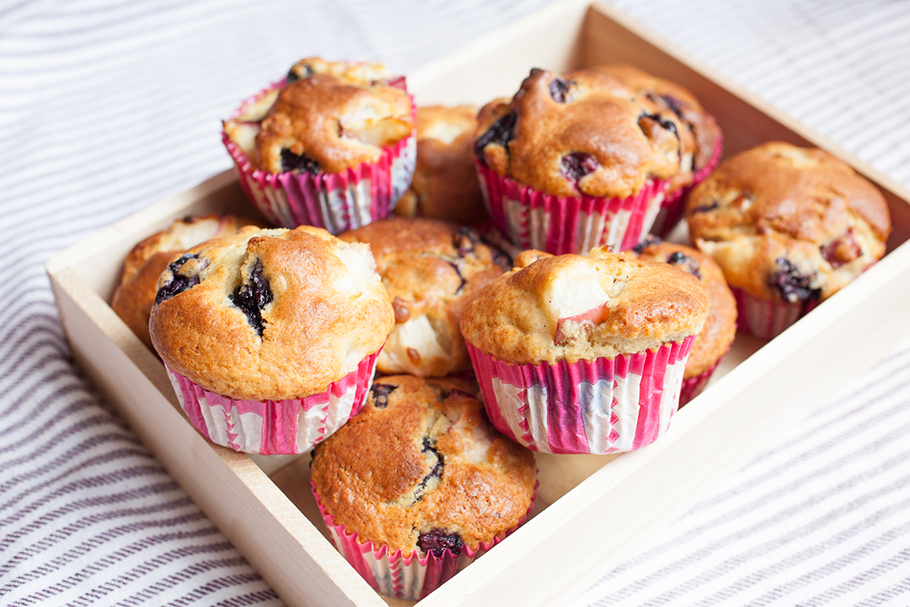
Rather then eating them raw I decided to bake with them. I am not sure I had ever baked with nectarines before but saw a receipe for nectarine and blueberry muffins and thought, I can’t really go wrong with that as there’s always the blueberries for flavour that should make the muffin tasty enough, even if the nectarines are rather dissappointing.

And the muffins came out really well! The nectarine flavour was intensified through the baking and when I brought them to a picnic everyone seemed to like them, as they were “…so light” and “…super fruty”.

I think they were even better the next day but they may not last that long, of course.

For 12 muffins you will need

  • 1 1/2 cups plain flour
  • 1/2 cup sugar
  • 1/2 tsp salt
  • 1/2 tsp baking powder
  • 1/2 tsp baking soda
  • 1/2 cup plain Greek yogurt
  • 1/2 cup oil (with a neutral taste, such as sunflower oil)
  • 2 eggs
  • 1 Tbsp vanilla extract
  • grated zest of 1 lemon, and some of it’s juice too
  • 1 1/2 cups blueberries
  • 2 big nectarines, cut into chunky pieces

Preheat the oven to gas mark 5/ 375 degrees F / 190 degrees C and line your muffin tray.

As with pretty much all muffins, the most important thing is not to over mix the dough! It’s always the same idea – mix the dry ingredients in one bowl, mix the wet ones in another then bring them together and fold the fruit in but don’t whisk or stir it, like you would a sponge cake.

So start by combining the flour, sugar, salt, baking powder and baking soda, using a spoon (or balloon whisk) in a big bowl.

I another bowl mix the eggs with the greek yoghurt, oil, lemon zest and a generous teaspoon’s worth of the lemon juice, using a balloon whisk.

Pour the wet ingredients into the bowl with the dry ones and combine them with a fork or spoon, until they are just combined enough (you will still see bits of flour but that’s good).

Fold the fruit in – again until just combined – and then add about 1 1/2 tablespoons worth of the mix into each muffin case and bake for about 20 minutes or until a skewer inserted in the middle of the muffin comes out clean.

Let them cool down on a wire rack completely before tucking in.

Belgian Waffles

Belgium Waffle web-1 Recently I went to Belgium for a few days, first I went to Bruges and then to Antwerp.

I really liked both cities, for different reasons. Bruges is a bit like a film set, quite surreal with all it’s historic buildings and just so picturesque. Antwerp is much more modern, both in it’s look and even more so it’s attitude. I was lucky to meet some chefs and chocolatiers in both cities and loved trying all their innovative creations.


And one day I also had to have a proper Belgium Waffle, the one that is made from a yeasty dough with crunchy sugar nibs inside and topped with whipped cream, caramelised nuts and strawberries – yummy!


So yummy, I had to learn how to make them as soon as I got back and here’s the receipe I used…

For around 16 waffles you’ll need:

  • 500g plain flour
  • a pinch of salt
  • 20g of vanilla sugar (or a tsp of vanilla essence)
  • 3 eggs
  • 300g butter, melted
  • 1 cube of fresh yeast (a cube here and in Germany is 42g)
  • 1/2 cup milk, lukewarm
  • 1/2 cup water
  • 300g pearl sugar (in Germany it’s called ‘Hagelzucker’ and in English it’s also called ‘nib sugar’ I hear)

Combine the flour, vanilla sugar and pinch of salt in a large bowl. In another small bowl or cup break up the fresh yeast and dissolve the yeast pieces in the lukewarm milk. Add this milk mix, along with the eggs and water to the dry ingredients and whisk everything together for a few minutes until a smooth dough has formed.

Let the dough rise, for an hour, in a warm spot – I wrapped the bowl in a dish towel and covered it with a duvet 🙂 Once the dough has risen, add the pearl sugar and immediately bake the waffles in a waffle iron.

Serve with whipped cream, berries and caramelized hazelnut pieces or whatever else you fancy!

Strawberry ‘Tiramisu’

StrawberryTiramisu web-2

It’s been a while since I last posted as the summer’s been busy so far.

However, this weekend I had a little down time and therefore the chance to make something to share with you, a strawberry tiramisu – well, sort of anyway.

There’s no alcohol or coffee in this tiramisu and as I wanted to a light ‘tiramisu’ it’s made with mascarpone as well as quark. I also decided to have just one layer of lady fingers, so I guess it’s not like tiramisu at all expect that it’s as yummy as an actual tiramisu.

The below recipe came about, when instead of plain quark, I bought a vanilla flavoured quark by accident in an English supermarket. If you can’t get vanilla quark where you are, just add some vanilla essence and another table spoon or two of sugar.

It’s very quick to make but does need to sit in the fridge for at least an hour for the lady fingers sponges to soak through.

For a tiramisu with 6 portions you’ll need:

  • 500g ripe strawberries
  • 3 Tbsp caster sugar
  • 250g mascarpone
  • 250g vanilla quark
  • 1 Tbsp fresh lemon juice
  • 100g lady finger sponge biscuits
  • the juice of one small orange

Cut the strawberries into quarters (or, if they are very small, halves) but leave a good handful aside uncut for decoration. 

Using a balloon whisk, whip the mascarpone and quark together with the sugar and lemon juice, then fold the strawberry pieces into the cream. Don’t worry if some of them break – they will give the tiramisu a pink tint, which is lovely.

To assemble, lay the lady fingers in a shallow dish in one even layer and pour the orange juice over them. Spread the strawberry cream over them and leave the dessert to set for at least an hour in the fridge. 

Decorate the tiramisu or each individual portion with the strawberries you left aside earlier before serving.

Raspberry and Lemon Birthday Cake

RaspberryLemonBirthdayCake-1Last weekend was my friend Debbie’s birthday.

We’ve been making birthday cakes for each other for years and as her birthday is in the summer I often make her birthday cakes with summer berries. 

This year it was going to be raspberries and when I thought of what kind of raspberry cake would be tasty, pretty and big enough so that all birthday party friends could enjoy a slice I came up with this lemon and raspberry creation.

It’s inspired by Jamie Oliver’s Royal Charlotte Birthday cake, which is rather suitable for Debbie too, as she is both a Jamie Oliver fan and a bit of a royalist! But I think most birthday girls and guys would enjoy this cake…

For the cake you’ll need:

  • 250 g unsalted butter, plus extra for greasing, softened
  • 250 g self-raising flour, plus extra for dusting
  • 250 g golden caster sugar
  • 4 large eggs
  • 1 tsp natural yellow food colouring
  • 1 lemon

For the icing/filling you’ll need:

  • 400 g icing sugar
  • 150 g unsalted butter, at room temperature
  • 1 tsp vanilla essence
  • 200 g cream cheese
  • 400g raspberries
  • 1/3 – 1/2 jar of good quality lemon curd
  • 1 lemon

Preheat the oven to 180°C/350ºF/gas 4.
Grease a 26cm springform cake tin with a little butter and line the base with greaseproof paper.

Beat the butter and sugar together until very light and fluffy. Add the eggs one by one, making sure you beat each one in well before you add the next, then fold in the flour, food colouring and zest from 1 lemon. 

Pour the dough into the cake tine, spreading it out well with a spatula, then place in the hot oven for 30-40 minutes, or until golden and an inserted skewer comes out clean. Allow to cool slightly, then carefully turn out onto a baking rack to cool completely.

Meanwhile, to make the icing, sift the icing sugar into a large bowl, add the butter and beat until pale and creamy. Add the vanilla essence, cream cheese, finely grate in the zest of 1 lemon and add a squeeze of juice, then beat until just smooth – it’s really important not to over-mix it. 

Once the cake is cooled, halve the sponge horizontally into two rounds. Spread the lemon curd onto one of the cooled sponges, then layer over half of the icing and half (or a third) of the raspberries. Cover with the other sponge and spread the rest of the icing on top and decorate with the left over raspberries.

Store in the fridge for at least an hour but bring back to room temperature before tucking in.

Banana Cake (a la Pret A Manger)

BananaBreadToday is a public holiday in all the three countries I have lived in – Germany has it’s long Pentecost weekend, England another May Bank Holiday and the US are honouring their Memorial Day. 

Hopefully, all of you who live in these countries have gotten at least one long breakfast or brunch in on one of the three weekend days. And maybe you have got time to get baking today too, in which case you may want to try out making this crowd pleaser of a banana cake. 

It’s actually the receipe for Pret A Mangers banana cake – or at least thats what I am told. It certainly tastes as good as the banana cake they sell there and is super moist, which is how I like my banana cake.

I had smaller than usual cake tins I wanted to use and, as you can see in the picture, the receipe yielded the 3 cakes of that size but usually the receipe would probably make two loaf cakes – or one big loaf cake if you have a big tin.

For the cake you will need

  • 2 eggs
  • 200g soft brown sugar
  • 300g banana, mashed with a fork
  • 2 tsps baking soda
  • 1/4 tsp salt
  • 130ml vegetable oil
  • 240g plain flour
  • 45g banana, chopped into chunks

For the icing you’ll need

  • 30g unsalted butter
  • 225g icing sugar
  • 100g cream cheese
  • 1/2 lemon, freshly squeezed
  • Preheat the oven to 120 degrees celsius.

Grease your baking tin(s).

Whisk the eggs and sugar until pale and fluffy. Add the mashed banana, bicarbonate of soda, salt and oil and continue mixing until well combined.

Slowly whisk the flour into the mixture, then fold in the chopped banana and pour the mix in the tin(s).

Bake for 1 hour or until a skewer poked into the centre of the cake comes out clean. Allow to cool in the tin for 10 minutes and then turn the cake onto a wire rack to cool completely.

Make the icing by beating the butter and icing sugar together until pale – which is pretty much impossible with so little butter, so you may want to add the cream cheese and lemon just straight away as well, if you need to. Some way or another you have to get everything whipped up to a frothy concoction. Do this with a whisk at high speed. When light and airy, spread over the top of the cooled cake. Allow to set before cutting the cake.