Walnut and Chocolate Chewies

chewies-1

Just on time for Christmas here’s one more receipe for your holiday baking.

If you live in the US or UK and have Santa coming around to drop the presents off in the morning you’ll have to leave him a little treat. And though in the UK it tends to be mince pies, I recommend leaving some of these tasty Walnut and Chocolate Chewies out instead.

I initially found these kind of cookies in Whole Foods in New York and have been looking for a receipe for them ever since and this one is the one that is most like them although I think that Whole Foods ones are a little sweeter and may have some actual chocolate chips in them as well. I shall try to add those to the next batch…

Wishing you all a Merry Christmas and a Happy New Year!

For about 12 cookies you’ll need:

  • 2 3⁄4cups walnut halves
  • 3 cups icing sugar
  • 1⁄2 cup unsweetened dutch cocoa, plus
  • 3 tablespoons unsweetened dutch cocoa
  • 1⁄2 tsp salt
  • 4 large egg whites, at room temperature
  • 1 tbsp pure vanilla extract

Preheat oven to 175 degrees Celsius. Spread the walnut halves onto a large-rimmed baking sheet and lightly roast them the oven for about 9 minutes, until they are golden. Let them cool slightly, then transfer the walnuts halves to a chopping board and coarsely chop them.

Lower the oven temperature to 160 degrees Celsius and line two baking sheets with baking paper.

In a large bowl, combine the icing sugar with the cocoa powder and salt, then add the chopped walnuts. Whisk in the egg whites, one after another, and vanilla extract and beat just until the batter is moistened (don’t overdo it or it will stiffen).

Spoon the batter onto the baking sheets in 12 evenly spaced mounds, and bake for 14 to 16 minutes, until the tops are glossy and lightly cracked. If you bake the trays at the same time, shift them from front to back and top to bottom halfway through to ensure even baking! 

Slide the parchment paper with the cookies on onto 2 wire racks and let the cookies cool completely before storing them in an airtight container for up to 5 days.

Cranberry & Orange Scones

cranberryorangescones-1

Despite the months long silence, I am still here!
Having moved to Berlin where I started photographing for someone else’s blog I have very much neglected my own little blog here but I don’t want to quit bringing you sweetest brunch ideas just yet. So I will try to get back into more regular posts again next year.

I may even write up one more post before Xmas as I will be busy baking Xmas cookies over the next few days and would like to share one of my new Xmas treat recipes with you too.

For now, I wanted to introduce you to these taste Cranberry & Orange Scones that would make a great breakfast for your Xmas morning. I have been tucking into them whilst writing my Xmas cards with a cup of tea in the afternoon but they are tastiest fresh out of the oven (but cooled down a little) and since they only take about 30 minutes to make you can easily bake up a batch for your brunch.

For 12 scones you’ll need

  • 1 1/2 cups fresh cranberries
  • 1/3 cup light brown sugar
  • the zest of 1 orange
  • 2 1/4 cups flour
  • 3 tsps baking powder
  • 1/2 tsp salt
  • 12 tbsps chilled unsalted butter
  • ca 1/2 cup milk (or a little more)
  • caster sugar, for sprinkling

Heat the oven to 175 degrees Celsius and prepare a baking sheets by lining it with baking parchment.

Using a food processor, whizz up the cranberries with the brown sugar and orange zest until roughly chopped.

In a big bowl combine the flour, baking powder, and salt. Add the chilled butter, spoon by spoon, rubbing it into the flour with your hands until you have a crumbly mixture.

Add the chopped up cranberry mix and milk and stir everything together just until the dough comes together – don’t over mix!

Sprinkle your worktop with a little flour, and turn the dough out on it, pressing it into a circa 4cm flat circle. Cut the circle into 12 pieces, as you would cut up a cake and line the scones on to your prepared baking sheet. Sprinkle each scone with caster sugar and bake for 20 to 25 minutes or until just golden.

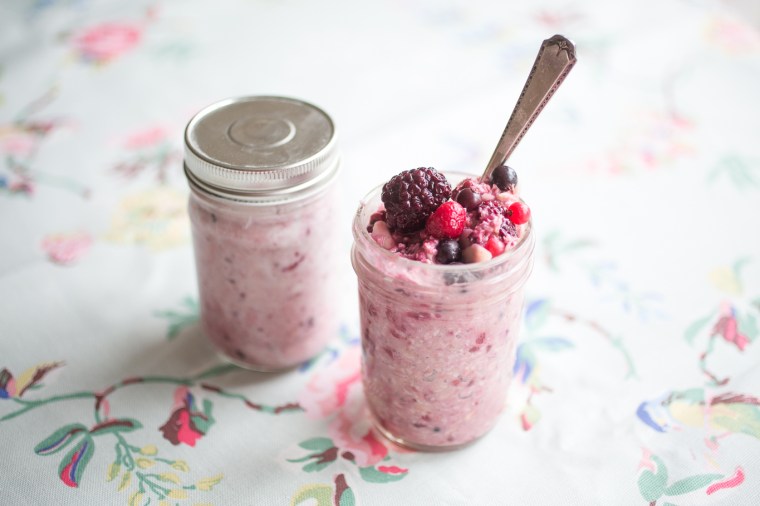
Summer Berry Bircher Müsli

SummerBerryBircher_JaelMarschner-1

I was recently working in the offices of a newspaper that had a staff canteen.
As well as lunch, they also served breakfast which is a great thing, when you’re running a little late in the morning and don’t have time to make any food, which, of course, never happens to me…

It’s can be tempting to go straight for a toasted bagel or a cooked breakfast of eggs even but as it’s summer here, I opted for something a little lighter, a Berry Bircher Müsli, which was so tasty I had to copy it.

What’s so tasty, I think, was the addition of vanilla essence as well as desiccated coconut, so this is what’s in my receipe here. It’s dairy- and sugar-free and if you use gluten-free oats it’s good for my gluten-free friends as well.  And even though it is a summer berry receipe, as it uses frozen summer berries, you can enjoy it all year around.

It’s super easy to make,  you just combine everything in a jar in the evening, leave it sitting in the fridge overnight and then have a great, healthy breakfast in a jar, ready to take with you in the morning, if you are ever running a little late say…

For one big portion you’ll need:

  • ½ cup oats (I like the finer milled ones, such as ‘Scottish porridge oats’)
  • ½ cup unsweetened 100% natural apple juice
  • ½ cup – or a little more – of frozen berries
  • 2 plus tbsp unsweetened desiccated coconut
  • 2 tbsp flaked almonds
  • 1 tsp vanilla essence

Combine the ingredients in a bowl and ensure that the apple juice evenly ‘coats’ all ingredients.

The frozen berries I use are a mix of summer berries of all sizes and shapes, such as redcurrants, blueberries, raspberries and blackberries. I add a heaped ½-cup scoop of them, frozen, to the müsli. The frozen berries will defrost overnight creating a juicier müsli.

Transfer your müsli to a jar and cover with a lid – or if using a bowl, cover it with cling film – and leave to soak in the fridge overnight.

In the morning, I slightly break up some of the bigger berries to let their extra juices soak into the müsli. I’d recommend waiting at least another 10 minutes for them to soak in, before tucking in.

Crumpies

Crumpies-2

It’s been a bad week for Britain. The Brexit vote brought a lot of racism and ‘idiocracy’ to the country I have lived in for most of my adult life, so much so that I think it may be time to move…

Luckily I’ll always have some good memories of Britain too, many of them featuring food, such as tasty Yorkshire Puddings! I’m mentioning them in particular as these crumpies here reminded me of them somehow. Maybe because they are made in an oiled muffin tin or maybe because the receipe by Jamie Oliver, who also has a good receipe for Yorkshire Puddings.

They are quickly made and you may even have all the ingredients for them in your kitchen cupboard already. You can top them with sweet jam or savoury cheese and should eat them when they are still warm, fresh out of the oven.

For 12 crumpies you’ll need

  • a little vegetable oil
  • 500 g strong bread flour
  • 1 tsp caster sugar
  • 1 x 7 g sachet easy action yeast
  • 2 tsps salt
  • a good pinch of bicarbonate of soda

Preheat the oven to 170°C/325°F/gas 3 and grease a 12-hole muffin tin with some vegetable oil.

Place all the other ingredients in a bowl and pour in 600ml of tepid water. The water needs to be warm enough to activate the yeast, but not so hot that it kills it. 

Whisk everything together until you’ve got a loose batter that is just combined – this should only take a few seconds. Leave to stand for 10 minutes to let the yeast do its job.

When the mixture is a spoonable, sticky consistency, but still quite wet, spoon it into the muffin tin. Fill each hole until it’s almost level with the top of the tin and cook for around 35 minutes, or until the crumpies are risen and golden.

Remove to a wire rack for a few minutes to cool slightly, then serve while still warm with anything you fancy.

Receipe by Jamie Oliver.

Chai-Spiced Pound Cake

ChaiPoundcake-2

This isn’t a receipe I initially planned to post in the summer.

Chai spices with the warming cinnamon and ginger are usually my go to comforter in colder months – but we’ve had some really rainy and grey days and a chai spice mix that my friend Anne gave me recently was waiting to be used, so here we go.

The spice mix she gave me was from The Spice Shop in London’s Notting Hill.
If you can’t get a good quality ready mixed chai spice near you, you can make your own by combining the following:
1 tbsp ground cinnamon, 
2 tsp of ginger and also of cardamon, 
3/4 tsp nutmeg as well as of clove and
1/4 tsp coriander.

The receipe here is based on an American pound cake and therefore has a rather huge amount of sugar in it, I’m afraid. It does give you super tasty and crispy crust though – enjoy!

For a 25cm ring or bundt cake tin you will need:

  • 230g butter
  • 650g caster sugar (I know!)
  • 5 eggs
  • 240ml milk
  • 1tsp vanilla extract
  • 1/4 tsp lemon extract 
  • 1 1/2 tsp of chai spice
  • 400g plain flour (plus a little extra for the cake tin)
  • 1/2 tsp bicarbonate of soda
  • 1/4 tsp of salt 

Preheat the oven to 170 degrees Celsius/ gas mark 3 and prepare the ring mood by greasing it really well, into all the creases – I use a brush for this – and dusting the greased cake tin with flour. 

Whisk the butter and sugar with an electric whisk until light and fluffy. 

Add one egg at a time, whisking it in with the other ingredients after each addition, again with your electric whisk.

In a separate bowl combine the spices, flour, bicarbonate of soda and salt then add to the butter mixture. Add the vanilla and lemon extract and beat everything together until well combined.

Pour the mixture into the prepared ring mould and smooth over with a palette knife. 

Bake for around 60 minutes until golden and a skewer inserted comes out clean.
Now, comes the most difficult part of the whole process if you ask me – getting it out of the tin! 

Providing you greased and floured it may come out just fine but I have had a few sticky situations so now use the following method: As soon as the cake is ready, pour some hot water over a tea towel in your kitchen sink. The tea towel should be soaked but not dripping. Let the cake tin sit on this towel for 10 minutes before turning it out on a wire rack, hopefully all being well, in one piece.