Buttermilk Waffles with Cherries & Cream

buttermilkWaffle

For today’s receipe I’m combining something from my recent American memories with my not quite so recent German childhood memories:

When I grew up in Germany, waffles were a special treat – a very popular one I might add. You could be sure that someone would have a waffle stall at any church or school fair and you’d always find them on Christmas Markets too. At home, most families also had waffle irons but they wouldn’t come out that much and certainly not as often as they seem to in the US where waffles are a bit more of a breakfast staple, such as pancakes. In America waffles are often eaten with maple syrup and maybe with some crispy bacon on the side. The fanciest way to eat waffles back home in Germany was with cherry compote and whipped cream – though more often then not us kids were just as happy to gobble them down with just a dusting of icing sugar.

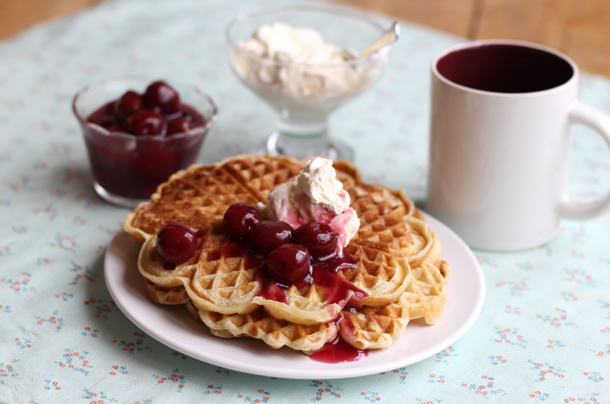
This morning I combined an American buttermilk waffle with some typically German cherry & cream topping and it worked a treat. Served as a breakfast or brunch it looks pretty and impressive but the nice thing is, that it is super quick and easy to make!

For 10 waffles, which is plenty for 4 people and might stretch to as many as 6 depending on their appetite, you’ll need:

  • 2 cups flour 
  • 2 tbsp sugar
  • 2 tsp baking powder
  • 1 tsp baking soda
  • 1/2 tsp salt
  • 2 cups buttermilk
  • 1/2 cup unsalted butter, melted
  • 2 eggs
  • circa 350 g of cherries in light syrup (in the UK and the US these usually come in small tins, so you will probably need two tins, in Germany in glass jars which are larger, so one jar will do)
  • 1 tbsp of corn flour
  • 250ml whipping cream, whipped


As with a lot of similar receipes, start by mixing the dry ingredients – the flour, sugar, baking powder, baking soda, and salt – with a spoon in one bowl.

In another, larger bowl mix the buttermilk, melted butter and eggs with a whisk then add the flour mix and combine all ingredients. Don’t over whisk the batter though, a few lumps here and there are fine.

For the cherries, add the fruits and juice to a pan and heat them up until the juices start to boil. In the meantime, mix the corn flour with an equal amount of water in a small cup and stir this mix in to the cherry pan, once their juice starts to boil. Keep stirring until the juice thickens, which will only take 2 minutes or so. If you like the juice to be thicker still, mix some more corn flour and water and repeat.

Heat up your waffle iron and set it to the desired browning strength you like you’re waffles to be baked at (if you haven’t used the iron before, check the manufacture’s recommendations) and get baking!

When I make waffles they get eaten pretty much straight out from the hot iron but if you want to bake them all first to serve them in one go, you can use your oven, set on a very low heat, to keep them warm.

Serve with the cherries and cream and tuck in!

Levain Inspired Chocolate Chip & Walnut Cookies

LevainCookies

So here it comes, the first receipe inspired by my recent time in New York.
I had heard of these chocolate chip cookies from Levain, with various sources telling me that they were the best in town, so I had to check the out. The original Levain Bakery is all the way up in Harlem – but it was so worth the track!

There they sell the famous chocolate-chip-walnut cookies freshly baked, still slightly warm, and though their lumpy shape might not get to win them beauty contests, taste wise it’s full marks all around. The outside is crispy while the inside texture is still chewy and cookie dough like. And the walnuts, which I am normally never a fan of, compliment the melted chocolate very well.

Unfortunately the receipe is secret, so my attempts to re-make them here in London will never be as good as the real thing but the chocolate and walnut combo in a gigantic chunky cookie I have tried out here are still good enough to share with you.

For 12 big cookies you will need:

  • 225g butter
  • 1/2 cup sugar
  • 1 cup light brown sugar
  • 1/2 cup dark brown sugar
  • 2 eggs
  • 3 cups flour
  • 2 tsps cornstarch
  • 1 tsp salt
  • 1 tsp baking powder
  • 1/4 tsp baking soda
  • 2 cups chocolate chips
  • 1 cup walnuts

Preheat oven to gas mark 4 and line 2 baking trays with baking paper.

Mix the sugars in big, huge bowl and cut the butter in to it in pieces. Then mix them together with an electric whisk until well blended and the mix has become a paler colour. (The butter shouldn’t be too soft for a cookie dough, which makes the mixing a bit hard and I had to stop the whisk a few times to free the beaters from the butter lumps…bear with it, you’ll get there eventually.) Now, add the eggs, one after the other and again whisk until well blended.

In another bowl mix the flour, salt, baking soda, baking powder. Add this flour mix in 2 or 3 stages to the sugar-butter-egg dough and beat it in, again with an electric whisk (or the help of a wooden spoon, if the electric whisk can’t cope, as was the case for me).Gently fold in chocolate chips/chunks and nuts and tip the whole dough on a clean surface to finish off the mixing and kneading by hand. Once you’re satisfied all is mixed in evenly form a thick roll and cut this in 12 equal portions.

Form 12 round balls out of these portions and place them on your baking trays. Cover these with cling film and put them in a freezer for 10-20 minutes, to cool them down again (but not freeze).

Take the tray out and transfer it directly to your preheated oven, where the cookies need to be baked for about 15-25 minutes, depending on how gooey/ raw you like them to be (be careful not to over bake as they harden when they cool down!).

Cool the cookies on a rack and eat them on the day they are made…maybe even after an hour or so, when they are cooled down but still ever so slightly warm, just like at Levain…sigh!

Chocolate Beetroot Cake

choc_beet_cakeJM01

I’m back!

Having spend most of the last three months in NY (with a visit to Botswana in between), I am now back in my own kitchen, here in London.

I have to admit, that I did become one of those New Yorkers who doesn’t bother cooking or baking. But why would you when the choice for eating out, delivery and deli food is so great. I loved the food markets, especially the weekly Smorgasburg in Dumbo…I loved the fact that you can get dessert at midnight, if you go to the Chocolate Room…I loved the American bbq joints… the cheap Chinese dim sum… the great Mexicans tacos…

And as for brunch – oh, how I’ll miss my weekly girlfriend brunch outings. My favourite brunch place overall was probably Bobo in Chelsea but I will tell you about that another time.

Right now, I want to share the first cake I made this year with you. Since it’s January and everyone (apart from me) seems to be on some new year’s resolution healthy eating scheme, I wanted to make something a little less loaded with sugar and fat and decided a chocolate beetroot cake is the way to go.

It might sound strange but is actually one of my most popular cakes. It’s lighter than a regular chocolate cake, probably as it contains neither butter nor chocolate but features sunflower oil and cocoa powder instead.

The icing is another story, of course. If you really want a healthier, reduced calorie cake you have to omit it, though you could maybe drizzle it with some plain melted chocolate instead. But I think, the taste of the sweet white icing on top of the dark cake is worth the extra calories. It also turns a plainer cake, that’s not too heavy and can therefore be eaten for brunch, in to a celebration cake, especially if you make enough icing for the top and a layer for within the cake.  

Either way, it’s super easy to make but you will need ready cooked beetroot (NOT the pickled vinegar one, of course) and a blender!

For the cake you’ll need:

  • 180ml sunflower oil, plus more for the tin
  • 190g self-raising flour
  • 60g cocoa powder
  • 1 tsp bicarbonate of soda
  • 250g (golden) caster sugar
  • 250g beetroot, cooked
  • 3 eggs
  • 1 tsp vanilla extract
  • a blender
  • a round tin at the size of 18cm min – 23cm max

Preheat the oven to gas mark 4 and line your cake tin  – both sides and bottom – with baking parchment

Combine the flour, bicarbonate of soda, cocoa and sugar in one big bowl.

In your blender, purée the beetroot, eggs and vanilla. Then slowly pour in the oil, while the motor is running on the slowest speed (make sure it really is on a slow setting and don’t take the lid of fully, or you may end up with a red kitchen…). Pour the beetroot mixture into the dry ingredients and gently combine by folding them together with a bit spoon or spatula.

Pour into the cake tin and bake for 40–50 minutes, until a skewer inserted into the middle of the cake comes out clean.
After removing it from the oven, leave it for 5–10 minutes in the tin, then turn it out on to a wire rack and peel the lining off to let it cool completely.


For the icing you’ll need:
(Note, that if you want enough icing for a sandwich cake, with a thick layer in the middle, you’ll have to double the quantities)

  • 25g white chocolate
  • 100g cream cheese, softened
  • 50g unsalted butter, softened
  • ½  tsp vanilla extract
  • 250g icing sugar
  • 1 tbsp whipping cream

Melt the white chocolate carefully in the microwave by using a low setting and checking it every 4 seconds. Stir until smooth, and allow to cool back to room temperature.

In the meantime, whisk together the cream cheese and butter with an electric whisk until smooth, then mix in the melted white chocolate and vanilla essence.

Finally beat in the icing sugar and cream, again with an electric whisk until fluffy.

Spread the cake and let it set in the fridge for at least an hour – but note, that before eating you want the cake back to room temperature, so the icing isn’t too hard!

Toasted Banana Bread with Maple Mascarpone and Plum Compote

It’s been too long since my last post but things have been a bit busy for me lately as I have temporarily moved to NYC for a couple of months, which is very exciting.

NYC is a food lover’s heaven!

I am based in Brooklyn and the two local shops down the road, delis, as they are known here, have more varieties of European cheese on offer than English supermarkets (which are in Europe, after all). You can also get all sorts of baking and cooking ingredients in the delis though it’s true what they say, New Yorkers don’t cook much. But who can blame them with so many nice eateries around. I intend to try out as many as possible whilst living here and hopefully will be able to recommend the best ones to you too.

Before coming out here, the last brunch I had in London was back at Workshop Clerkenwell (see my earlier review here). My favourite dish there that day was a toasted banana bread with espresso mascarpone and rhubarb compote. It inspired me to make my own version of this at home: toasted banana bread with maple mascarpone and plum compote, which is probably the longest receipe title on my blog yet.

I looked for a fat free banana bread receipe, which I found on Gourmet Getaways, as I like to top it with a generous helping of mascarpone and figured that would be rich enough. As for the fruit compote, you could go with any fruit of your liking but I since plums are in a season right now, that’s what I’d recommend. You could use the plum compote receipe that I gave out for the oat pancakes a while ago.

You can make the banana bread up to 3 days ahead, if you like since it will be freshly toasted just before serving.

For one banana bread, you’ll need:

  • 2 cups plain flour
  • 1 tsp bicarbonate of soda
  • 1 tsp salt
  • 1 cup brown sugar
  • 4 ripe bananas
  • 1 tsp vanilla extract
  • 2 whole eggs

For the plum compote, you’ll need:

  • 500g plums
  • 50g sugar
  • 3 tablespoons of lemon juice (or water)
  • 1/2 teaspoon cinnamon
  • 1 cinnamon stick

For the mascarpone:

  • 250g mascarpone
  • 1 tbsp maple syrup, or more if desired

Start with the cake:
Grease and/or line a loaf tin and preheat the oven to 160 degrees,

Mix the flour and bicarbonate of soda and salt in a large bowl, then add the sugar.

Mash the bananas in another bowl, with the help of a fork – they don’t need to be fully mashed to a puree, leaving a few chunks is actually quite desirable.

Break the eggs into a small bowl and lightly beat them, then add them to the mashed banana along with the vanilla essence. Combine the three and add the mix to the bowl containing the flour. Mix gently with a wooden spoon until combined.

Pour the mix into the prepared loaf tin and bake at 160 degrees for 40mins or until a skewer comes out clean. Cool down for 5 minutes before turning the cake out to cool down fully on a wire rack.

Now make the plum compote, for directions please see my earlier post here.

For the maple mascarpone, just mix the two ingredients together until the syrup is blended in and the mascarpone is getting softer.

Just before serving, cut chunky slices off the bread and – for best results – toast them, for about 3-5 minutes, in a non-stick griddle pan on a medium heat. Alternatively, a toaster will also do the trick.

Serve with a spoonful or so of the compote and a generous dollop of the sweetened mascarpone, which will start melting on the warm banana bread. Hmmmmmmmhhhh….

Lemon Courgette Cake

After volunteering in Botswana earlier this year I am going back in October to see some of the kids in the school I worked at again and to help setting up some more orphan projects with a group of volunteers and therefore I have started ‘baking for charity’ again.

I am getting involved hands on, on these projects but I am also raising funds for the charity, the Botswana Orphan Project  and one of the ways of doing this is by baking cakes and giving them out for donations in my office.

Admittedly, it’s a very slow way of raising money (and maybe even a bit of a false economy if you consider the costs in making a cake, which a donations of £1 a piece hardly covers…) but I like baking and so far, my office colleagues like eating.

The easiest things to make for these charity bakes – mainly, for transport reasons – are muffins or loaf cakes,  and I thought I’d share a receipe for one of the later, a Lemon Courgette Loaf Cake, which can also be served as a tasty breakfast cake.

Don’t be scared of it containing a vegetable – you’ve probably had carrot cake and now it’s time to broaden your (vegetable cake) horizon!

It’s very easy to make, sweet yet lemony, and the grated courgette along with the buttermilk keep the cake moist.
And, you’ll need neither scales nor an electric whisk to give this receipe a go – so why don’t you this weekened?!

Receipe from : http://nancycreative.com/2012/03/25/lemon-zucchini-loaf-with-lemon-glaze/

For the loaf cake you’ll need:

  • 2 cups plain flour
  • 2 tsp baking powder
  • ½ tsp salt
  • 2 eggs
  • ½ cup sunflower oil
  • 2/3 cup sugar
  • ½ cup buttermilk
  • Juice and zest of 1 lemon
  • 1 cup grated courgette

And for the lemon glaze:

  • 1 cup icing sugar
  • 2 1/2 Tbsp, at least, of bottled lemon juice

Preheat the oven to Gas mark 4.

Grease and line a 9”x5” loaf baking tin.

Grate the courgette until you have a cup full of it. Don’t peel the courgette, as the little green spots from the skin add a nice touch to the cake (wash it first, of course).

In one bowl mix the flour with the baking powder and salt and set aside.

In another, larger bowl whisk the 2 eggs with a balloon whisk. Then add the oil and sugar and whisk them all again.

Now add the buttermilk, lemon juice and lemon zest and blend everything together, before folding in the grated courgette.

Finally add the flour mix from the bowl you set aside earlier, again folding it in with a balloon whisk. Pour the cake mix in the prepared loaf tin and bake for about 40 – 45 minutes. Do the toothpick test to know when it is ready and take it out of the oven, as soon as the toothpick comes out clean.

Cool in the tin for 10 minutes then turn the cake out on to a wire rack and let it cool completely.

For the glaze, using a spoon mix the lemon juice in to the icing sugar in a small bowl. Keep stirring until there are no lumps and the consistency is thick but pourable. Drop the glaze on top of the cake, helping to spread it with a knife (keep repeatedly cleaning it in hot water as you keep icing) and letting it drizzle down the sides (you may want to keep some paper under the wire rack as any spillage will be very sticky).

Let the glaze set and serve!