Watermelon & Mint Granita


WatermelonWEBjpgIt’s been a while…
The reason is that I am on vacation, back home in Berlin – hot and sunny Berlin!

The temperature keeps hitting the mid thirties here and all I feel like eating when it’s this hot is ice cream. And even ice cream can be too rich when you’re in need of a rehydrating refreshment to help cool down, therefore my choice tends to be a juicy sorbet or granita.

I got introduced to granita in Sicily, where it’s more popular than Italian gelato. I also kept eating it in NYC last summer, where it’s sometimes also called shaved ice. Either way, I decided to make one and give you the receipe – for when you can’t face a rich brunch…

You’ll need:

  • 8 cups of cubed watermelon (seedless or seeds removed!)
  • 1/3 cup sugar
  • ½ cup water
  • the juice of 3 limes
  • 1 cup of fresh mint

Dissolve the sugar in the water by stiring it together in a small saucepan over a low heat until the sugar has disappeared.

Increase the heat and boil the sugar water until it becomes a little more syrup like, for about 3 minutes. Set aside to let it cool.

Blend the watermelon with the lime juice – in two batches – until it all becomes a juicy slush. Chop the mint and add it, along with the cooled down sugar syrup and mix all ingredients together.

Transfer the mix in to a shallow’ish metal or plastic and freeze this for about 4-5 hours, scraping the mixture with a fork every 40 minutes to mix the frozen bits from the bottom and sides into the unfrozen middle.

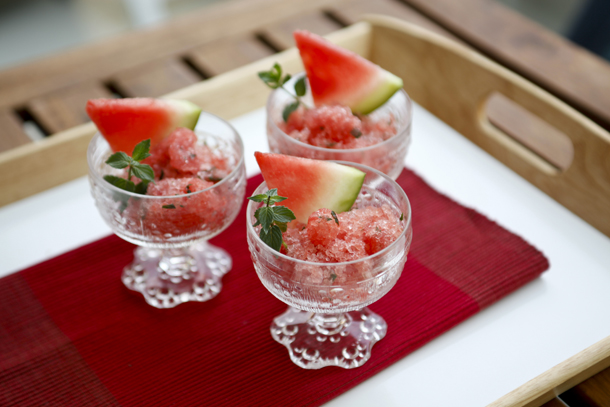
When you’re happy with the consistency, pile it into glasses (and if you like, serve with a little extra mint and little slice of watermelon). 

The granita is best eaten on the day it’s made.


Raspberry Quark-Cream Cake

raspberry_gateaux_1mini

You’ve got to love summer berries, especially when they are at the peak of their short-lived season. Right now, this is the case for raspberries. They are at their best, picked straight from the bush but they also taste great on top of this cake.

This cake is also very summery, in the way that German cakes are often lighter and less sweet than a Victoria Sponge for example. It has a light Quark topping under which a thin layer of meringue is hidden, which gets baked at the same time as the base of the cake, so it doesn’t take hours of preparation.

As this is a German receipe I am using German packs of vanilla sugar, which contain 8 grams of Vanilla Sugar. If you don’t have vanilla sugar, I’d suggest using 1 teaspoon of vanilla essence for 1 vanilla sugar pack instead.

You’ll need:

  • 2 eggs
  • 65g butter
  • 1 pinch of salt
  • 2 packs vanilla sugar
    (or 2 tsp vanilla essence)
  • 250g caster sugar
  • 75g plain flour
  • 1 tsp baking powder
  • 3 Tbsp milk
  • ½ tsp lemon juice
  • 600g fresh raspberries
  • 5 leaves of gelatine
    (I am using Dr Oetker, which are 1.66gram per leave)
  • 250g whipping cream
  • 750g quark
  • a little oil or butter to grease the cake tin
  • a round spring cake tin with a 26cm diameter
    (possibly a cake ring)

Preheat the oven to 175 degrees Celsius.

Separate the eggs and start by making a quick meringue base from the egg whites, by – using an electric whisk – whisking them with the lemon juice and 100g sugar until stiff.
Set aside.

In a small bowl, mix the flour and baking powder. In another bowl, mix the butter, salt, 1 package of vanilla sugar (or 1 tsp of essence) and 60g caster sugar until a creamy consistency forms – again, using an electric whisk. Add the egg yolks one by one, followed by some of the flour-baking powder mix with a little bit of the milk, whisking it in before repeating this until all the flour and milk are incorporated.

Grease your cake tin and spread the cake mix in it. Now top the cake mix with the meringue mix but don’t spread it to the edges, instead leave a 1cm gap to the cake tin all around the base (I gather this is so that the meringue can rise and doesn’t stick to the tin). Bake for 25 minutes.

After it’s baked, take the cake out of it’s tin as soon as it comes out of the oven and let it cool on a wire rack.

For the topping, whip the whipping cream to soft peaks. 

Soak your gelatine in a bowl of cold water. In another bowl, whisk together the Quark, 90g caster sugar and the second pack of vanilla sugar. Take the gelatine leaves from the water, gently squeeze the excess water out. Dissolve them by warming up 5 tablespoons of the Quark mix on the hob – careful not to boil! – then stir in the gelatine until dissolved. Stir this in to the Quark mix and fold the whipped cream under.

Spread the topping onto the cake – if it is running all over the sides and you find this effect too messy, use a cake ring at this stage, which will help contain the Quark topping in one place until its set. Let the topping set in the fridge for 15 minutes. After this initial cooling, top the cake with around a third of the raspberries, lightly pressing them into the topping. Again, let it set in the fridge – this time for 2,5 hours.

Now add the rest of the raspberries and tuck in immediately!

raspberry_gateaux_7mini 


Three Ingredient Scones

EasyScones_1

I have been eating a few scones recently on various afternoon tea and film shoots. That’s when it occurred to me that scones make quite a nice morning snack too, especially when they are as easy and quick to make as my “Three Ingredient Scones”.

What I am about to share is probably my shortest receipe on here as it only needs three ingredients. In my receipe book, it actually consists of a small post-it note and all that’s written on it is:
“3 c self-raising flour, 1 c lemonade, 1 c cream – 10-15 mins/ 220 degrees”
And there really isn’t much more to it  except topping them with a large helping of clotted cream and strawberry jam!

For some scientific reason, the bubbles in the lemonade react with the raising ingredient in the self-raising flour, so the scones rise, the cream makes it moist and there’s no need for butter and as the lemonade is sweet you won’t need any sugar either. It really is that easy.

For circa 15 scones you’ll need:

  • 3 cups of self-raising flour (plus extra for your work surface)
  • 1 cup of sparkling lemonade
  • 1 cup of cream
  • (if you like, some milk to brush the tops with before baking to brown them)

Line a baking tray with baking parchment and preheat the oven to 220 degrees celsius.

Combine the three ingredients in a large bowl until they form a dough.

Turn the dough out on to a floured surface and flatten it with your hands so that it is about 1 cm thick and cut out scones with a scone cutter, gathering and reforming the leftover dough until all is used up.

Line the scones upon your baking tray and if you wish for them to brown easier, brush the tops with a little milk, and bake for 10 – 15 minutes until they become golden (with slightly darker tops, if you used milk).

Leave to cool on a wire rack and eat the same day!

Apple and Marzipan Swirls


New_IMG_9870

I love baking but at the same time, I have a little fear of baking with yeast.
My fear is that the dough will not rise enough and that all the waiting for it to rise and rise again, was a waste of time. But I also love baked goods made with fresh yeast, so I have decided to overcome this fear.

A chance to do so, offered itself when I had some fresh yeast left over (from the waffles) and cake sale coming up at work. I decided to try out these Apple Marzipan Swirls, knowing that they would be a good treat for my brunch blog. They are great fresh from the oven, first thing in the morning but all the work has to be done the night before.

They proved a success –  so much so that they all sold out within the first few minutes!


For 12 swirls you’ll need

  • 450g flour (plus extra for the work surface)
  • 20g fresh yeast
  • ca 250ml milk
  • 2 Tbsp sugar
  • a pinch of salt
  • 400g apples
  • 150g good quality marzipan
  • 2 Tbsp lemon juice
  • 100g apricot jam

Start with the dough the night before baking:
As this is a fresh yeast dough, you’ll have to make a ‘pre-dough’ (I’m not actually sure of that is the real English term for this or just a direct translation from German but let’s just go with it). Tip the flower into a big bowl and make a little well in the middle of it in which you crumble the yeast, along with about 3-4 tablespoons of lukewarm milk and a pinch of sugar. Dust this with a little flour from the sides and leave, covered under cling film, in a warm corner for 15 minutes. I covered my bowl under my duvet (!) and also put a hot water bottle underneath.

Add the rest of the milk and sugar as well as the salt and knead the ingredients together in the bowl – be warned, it’s a very sticky business!

Dust a work surface with flour and tip the dough onto it. Knead for at least 5 minutes until the dough is smooth and no longer sticky. Now put it back in the bowl, cover with cling film again and bring it back to the warm corner to leave it to rise some more – this time, until it rises to double its size. This will take 30 – 60 minutes (when checking on this, just look through the cling film – don’t lift it).

While you wait for the dough to rise, make the apple marzipan filling:
Peel and core the apples and cut them in to small pieces and when I say small, I’m talking little tiny squares of about 1-2 square cm. Follow suit with the marzipan by cutting it in pieces of a similar size. Mix both together with the lemon juice and set aside until the dough is ready for the next step.

When the dough has doubled in its size, roll it out on a flour-dusted surface, to a rectangle of about 50 x 25 cm.  Pour the apple-marzipan mix on to it and roll it up, from the longer side, so you end up with a long roll. Cut the roll in 12 pieces and put those on two non-stick baking trays. You will need to spread them out as much as possible as they will rise again. Cover the trays with cling film and leave to rest in the fridge for the night.

The next morning, the swirls will have risen again. Take them out of the fridge and let them come back to room temperature while you preheat the oven to 200 degrees.

Bake the swirls – one tray at a time – for 25 minutes. Heat the apricot jam in the microwave so it becomes fluid and spread the rolls with it, as soon as they come out of the oven. Leave to cool but then enjoy as soon as possible!


Baked Rhubarb Custard Pots


RhubarbPots_1webA few weeks ago, I got very excited when, for the first time this year, I found a cart full of  pink and green bunches of tender springtime rhubarb at my local farmers market.

That same weekend was also the first time this year that we had a proper sunny Sunday, which meant it was time for my first brunch on my balcony.

The dish for this was meant to showcase my newly purchased rhubarb stalks, so I decided to make a quick and easy custard bake, which is a ‘clafoutis’ like dish that can be made easily with all the ingredients that you probably already have at home…except the rhubarb!

For about 6 portions – depending on the size of your dishes – you will need:

  • 300g thin stalks of rhubarb
  • 100g butter, melted and cooled
  • 140g – plus an extra 6 Tbsp – sugar
  • pinch of salt
  • 2 eggs
  • 2 egg yolks
  • 185ml milk
  • 60g flour

Preheat the oven to 180-degrees/-gas mark 4.
Butter 6 pudding or brulee dishes.

Wash and cut the rhubarb into the length of your pudding/brulee dish diameter and line the base of the dishes with a layer of it. On top of the first layer, add another layer in the opposite direction, so you have a kind of overlapping lattice.

In a jug, whisk the butter, sugar, salt, eggs and egg yolks together. Add the milk and flour and whisk again, so that there are no lumps. Pour over the rhubarb until they are just covered with some pieces still poking out, if you wish.

Sprinkle with the 6 tablespoons of sugar and bake for about 25 minutes until the top is golden and a little crispy and the rest of the custard set. Leave to cool before serving.