Ricotta Hotcakes with Rhubarb Compote

RicottaHotcake_910web2

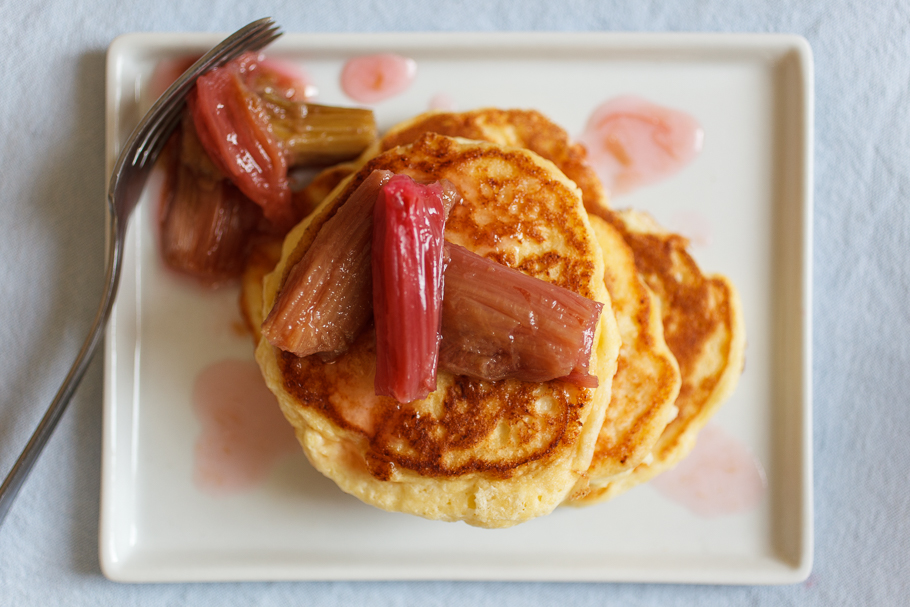
We are currently working on a brunch feature at work. This had me going to Granger & Co, a London restaurant by Bill Granger, for a photo shoot where we had to photograph various brunch dishes, including their famous ricotta hotcakes.

I first tried them in the original Bill Granger restaurant in Sydney and they are still as good as they were all these years ago and I have been wanting to share them with you for a while.

In the restaurant and original Bill Granger receipe they are always served with a honeycomb butter but I think they go very well with a simple rhubarb compote too.

Rhubarb season has just started in England and even if you don’t fancy the hotcakes, you should get yourself some rhubarb and make the compote which takes no longer than 15 minutes and is great with a simple greek yoghurt too.

For the rhubarb compote you’ll need:

  • 500g rhubarb
  • 160g sugar
  • 2 tbsp water
  • 1 tbsp lemon juice
  • 1 tsp vanilla essence

Place the rhubarb, sugar, water and lemon juice into a medium saucepan set over low heat and cover. 

Simmer gently, stirring occasionally for 10- 15 minutes until rhubarb is tender but not totally fallen apart (keep checking).

Remove from the heat and set aside to cool down.

For enough hotcakes to feed 4-6 people you’ll need:

  • 340g ricotta cheese
  • 190ml milk
  • 4 eggs, separated
  • 125g plain flour
  • 1 tsp baking powder
  • 1 pinch of salt
  • a little vegetable oil to bake the pancakes 

Whisk the egg whites until they are stiff and set them aside.

In a large bowl combine the egg yolk, milk and most of the ricotta – but keep two tablespoons of the ricotta aside. Sift the flour and baking powder over the mix and gently fold it through.

Now fold the egg whites, in two batches, through the batter, along with the two tablespoons of the ricotta you have set aside. This is to keep some ricotta lumps in the hotcakes, which makes for a nicer texture.

Heat a little oil in a frying pan and drop two tablespoons of batter per hotcake in the pan. Fry the hotcakes over a low to medium heat for about 2-3 minutes per side, so they become cooked through and golden on the outside.

Serve with the rhubarb compote.

Austro-Hungarian Cherry Traybake

HungarianCake

I was recently asked to try out and photograph a recipe from an Austro-Hungarian Cookbook for Jewish Renaissance Magazine and I thought I’d share it with you.

With some of my own roots coming from a similar area I noticed one receipe that reminded me of the plum traybake that my gran makes and I have featured here before. It’s similar in a way that it has a meringue-like topping but the pastry here is a lot thicker and richer.

It’s not that much of a looker to be honest but my office colleagues gave the taste high marks which make up for it, so I think I may make it again some time.

Receipe taken from Tomi Komoly’s ‘My Granny’s Gift’ book, where it’s called ‘Ladie’s Whim’ ( I have no idea why and think Austro-Hungarian-Cherry-Traybake might be a bit more descriptive, so I am going with that)

Ingredients

For the pastry:

  • 220g plain flour
  • 150g butter
  • 70g caster sugar
  • 3 egg yolks
  • 1tsp vanilla sugar or a few drops of vanilla essence

For the filling:

  • 500g of fresh or preserved ‘sharp’ fruit such as raspberries or Morello cherries (I went with preserved sour cherries)
  • 120g icing or caster sugar
  • 3 egg whites
  • 150g of finely chopped walnuts

Preparation:

Mix the pastry ingredients by hand, roll out into a thin layer (say 4-5mm) and place into a baking tin.

Alternatively, choose a baking tin of about 30 x 18 cm or 25 cm diameter round, and pat the pastry into it evenly.
Bake for about 25minutes or until just beginning to brown on gas no.3 (160 C).

Place the fruit on top evenly. Beat the egg whites with the sugar (adding the sugar very gradually) until firm, add the chocolate slowly, and finally blend in the walnuts.

Spread this mix on top of the fruit, and bake for a further 30 minutes on gas no.2 or until the meringue has set.

Banana Granola

BananaGranola

Recently I was back in NY again (hence the quietness on here) and usually I come back with all sorts of receipe ideas that are rather high on the sugar and calorie fronts (but so tasty!).

This time however I am bringing you a rather healthy granola that my AirBnB flatmate made.

As it’s a banana granola you need less sugar – in form of maple syrup in this case – than with your usual granola.

It’s also made with coconut oil and again, you don’t need as much oil as with other granolas as the mashed banana does it’s bit to give you those crunchy granola clusters you want.

See if you like it…

You’ll need

  • 3 cups rolled oats
  • 1/2 cup almonds, roughly chopped
  • 1/2 cup pecans, roughly chopped
  • 1/2 tsp cinnamon
  • 1 pinch of salt
  • 1/4 tsp vanilla extract
  • 3 tbsp coconut oil, at room temperature (let’s say at a warm room temperature so its pretty much liquid)
  • 3 tbsp maple syrup
  • 2 very ripe banans, mashed up

Preheat the oven to 200 degrees celsius /gas mark and line a baking tray with baking paper.

In a large bowl combine the oats, nuts, cinnamon, salt.

In another bowl mix the vanilla, coconut oil, maple syrup and banana mash together – get your hands in there to get it all smooth and evenly combined.

Add the banana mix to the oat mix – again, with your hands to get everything evenly coated.

Spread the mix on to your baking tray and bake it in the oven for 15 – 20 minutes.

If you want crumbly granola, stir it all up half way through baking, tossing and turning the oat mix around. Alternatively, If you want big lumps you can also bake it as a sheet – maybe turning the sheet once – and break it up after baking.

Keep an eye on it so you don’t burn your granola as it browns quickly.

When it’s done remove it from the oven and toss it a bit more to cool it down. When it’s completely cooled down it should keep for a couple of weeks in an air-tight container.

Easter Carrot Cupcakes

web_EasterCarrotCake

Easter is coming up but I won’t be home for it, so as you can see, I have already done my Easter Baking.

At first, I considered making some traditional English Hot Cross Buns. But then I thought of the big Easter Brunch buffets that are the popular thing to do all over Germany and I decided to make something that would be a nice addition to such a buffet: little carrot cupcakes (because Easter bunnies like carrots, right?!). 

They are not like an American or English carrot cake but based on a Swiss receipe and much lighter, as they are almond based. You may also find the icing a lot less sweet and not as rich as your usual cupcake icing but it works great on these little delights.

And with only one table spoon of flour you could probably easily make them gluten free too.

Please not that they are little indeed, so make sure you use the smaller cases, which are called cupcake cases in the Uk, rather than what here we call muffin cases.

For 12 small cupcakes you’ll need:

  • 2 eggs
  • a pinch of salt
  • 70g caster sugar
  • 100g ground almonds
  • 1 tbsp plain flour
  • 100g grated carrots

And for the icing:

  • 100g unsalted butter, softened
  • 150g cream cheese 
  • 150g icing sugar
  • grated rind of one orange
  • white chocolate mini carrots to decorate (optional)

Preheat the over to gas mark 4 / 180 Celsius /  350 Fahrenheit.

Line a 12 cup muffin tin with small liners (see note above).

Separate the egg whites from the egg yolks and, after adding a pinch of salt, whisk them until they form stiff peaks. Then add the sugar by whisking it in, in about 3 batches – don’t over whisk this as you want to keep the volume from the whisked egg whites.

Stir in the egg yolks, again gently, then using a spatula carefully fold the ground almonds, flour and grated carrots under until everything is combined.

Bake for 25-30 minutes or until that tooth pick comes out clean.

Take the cakes out onto a wire tray to let them cool down completely.

For the icing, cream the softened butter with an electric whisk, then add the cream cheese and whisk them together until they are of a whipped constancy. Whisk the icing sugar in and finally the orange rind. 

Once the cakes are completely cooled down, either pipe the icing on top or simply spread generous swirls of frosting on your cakes, using a knife or the back of a tea spoon and if you like add a little carrot, of the chocolate variety, on top,

Happy Easter!

Quick Hazelnut Twists

QuickNutTwist_16Pastries are always a good start to a brunch.
And, on their own, they make a great breakfast.

Making the actual pastry for pastries however is a rather lengthy process that I tend to cheat on by buying ready-made pastry, as I did for these quick and easy to make Hazelnut Twists. 

If you want to make them from scratch you might want to go with a yeast based dough (such as the one I used for my Apple and Marzipan Swirls) instead of puff pastry. But if you want the quick option, try this receipe.

For eight twists you’ll need:

  • 1 cup finely chopped, toasted, hazelnuts
  • 1/4 cup finely chopped, toasted, walnuts or pecans
  • 1/2 cup light brown sugar
  • 2 tsp cinnamon
  • 1/2 cup unsalted butter
  • 1/4 cup honey
  • 2 sheets of ready-bake puff pastry
  • a little flour 

Preheat the oven to gas mark 7 and line two baking trays with baking paper. 

Stir about two-thirds of the nuts, the brown sugar, and the cinnamon together in a small bowl and set aside.

Melt the butter in a small saucepan over low heat, then stir the honey in and set aside.

Dust your working surface with a little flour and unroll one of the puff pastry sheets on to it. Brush it with a layer of the honey butter and sprinkle half the nut and sugar mix over the whole pastry sheet.

Top with the second puff pastry sheet and pour the remaining nut and sugar mix on top.
With a rolling pin, gently roll over the the nut and sugar on the top sheet. The idea is to press the nut and sugar mix into the dough and make it stick, not to roll out the dough!

Cut the dough into 8 strips, length-wise. Then cut them vertically in the middle, so you end up with 16 long rectangles.
Pinch two rectangles together at one short end, holding them closed with the thumb and index finger of one hand. With the other hand, twist the ends of the two rectangles around a few times and fold a circle with the twisted pieces, pinching the two pieces together at the other end. 

Place the folded twists onto the baking sheet and sprinkle any fallen off nuts over them.
Bake for 10 minutes, then rotate the baking trays as the twists brown quickly. Bake for another 10 minutes, then turn down the heat to gas mark 4 and bake for another 10 minutes, possibly covering the twists loosely with some aluminium foil to prevent any burning.

Remove the twists from the oven and transfer them to a wire rack, set over a dish towel (to catch any of the honey butter you are about to glaze them with). Re-heat the remaining honey butter and brush the twists with it liberally, then sprinkle with the nuts you set aside at the beginning.

Let them cool down for 5 minutes and then enjoy them warm!